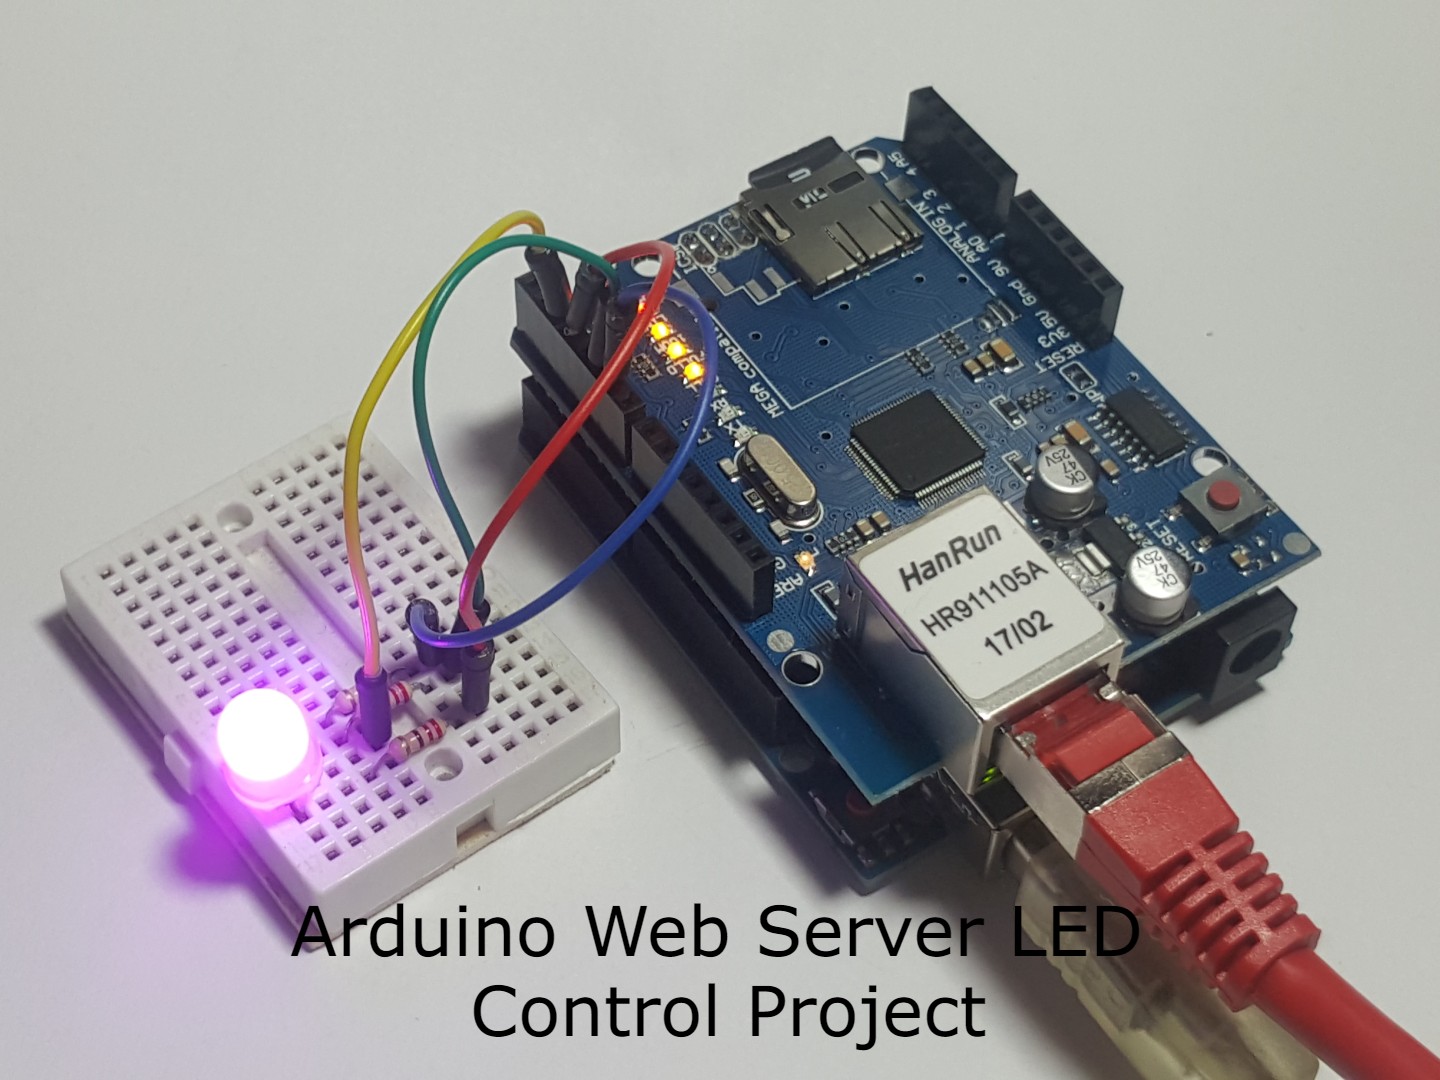
Robotics and Energy Logo

Arduino Web Server LED Control project

DIY tutorial β€” Arduino remote control LED via a web server

Our Arduino remote controlled LED LIGHT STRIP project is now ready πŸ‘‡

Arduino web server LED control project

Web development is one of the most advancing fields in modern technology. Companies like Intel and Cisco are developing internet-controlled devices that can be managed via web interfaces accessible through local area networks.

What will we learn

In the Arduino web server LED control project we will use an Arduino and an Ethernet shield and we will create a small http web server, like a website, on our LAN which will control an RGB LED with an interactive web interface.

The website will also be password protected, since cyber security is crucial in the world of control over network. This small but a bit complicated project will be your key entering the world of IoT, WEB development and Networking. From there the possibilities are endless!

You can download the code of this project here. The code will be fully explained in the software section below.

Primary parts for this project will be:

Programming languages used:

  • C (Arduino compatible)
  • HTML
  • CSS
  • JavaScript

Hardware

In terms of hardware the project is not very complicated. There is no need for previous electronics experience as far as I'm concerned. The Ethernet shield is applied pin to pin directly on the UNO board.

LED Assembly

Assemble the LED on the breadboard, it has 4 pins. Let's call them 1, 2, 3, 4. Put 3 x 220 Ohm resistors in series with pins 1, 3 and 4. Connect pin 1 (Red) of the LED to pin 3 on the Shield through the resistor, pin 2 (Vcc) to pin 2 directly, pin 3 (Green) to pin 5 through a resistor and pin 4 (Blue) to pin 6 through a resistor.

Since the LED in my case is a Common Collector we would need to apply ground to the pins to turn on colors.

Missing

RGB LED pinout schematic (312Γ—375)

Network Configuration

To operate we will need to program a web server on the Arduino and connect it to the network using a Modem or a Router. I used a TP-Link TL-WR841N Router which supports Ethernet connection and Wireless, for which the default IP is 192.168.0.1 and the login details are User: admin / Password: admin. Connect an Ethernet cable to the Shield's Ethernet port and plug it to the Router. A second cable can connect to a PC, or you can use the wireless interface.

Missing

Full wiring diagram β€” Arduino + Ethernet shield + RGB LED (694Γ—822)

Arduino Ethernet ShieldArduino Ethernet Shield side view

Software

Most of this project and its added value is the software and is the bigger challenge, as it is in the industry of WEB development. We will go through the full design and development of the web pages and the server and the benefits of the use of various programming languages C, JavaScript, HTML and CSS which developers use in the industry. I'm going to assume that you are somewhat familiar with the programming languages we are going to use and know the basics.

The Arduino is a microcontroller based development board which is programmable using the ArduinoIDE. We need to turn this into a Server which will host connecting clients, handle requests and upload the site's hyper text to the user's browser to display.

We can use the println() function to transmit the entire code of the site, however this is very much memory consuming so we prefer to minimize the use of that and store the web code in files instead. Fortunately the Ethernet shield we are using supports an SD card slot and we can store the files on it and load them from there when needed.

Programming the website files

We will start programming the files that will be stored on the SD card β€” all the web pages. Each page's code will be a different file ending with .htm extension. In addition, there will be a CSS file where we'll design all the graphics of the site including the flashing RGB LED. We can edit them in any text editor e.g. Notepad++. We do not need to activate the Arduino yet β€” we may open them and run them directly in the browser.

  • login.htm β€” Login page
  • main.htm β€” Menu page
  • control.htm β€” LED control page UI
  • 404.htm β€” Page not found error if the user typed something wrong in the URL
  • 401.htm β€” Unauthorized page if authentication failed
  • style.css β€” Graphical design of the pages
  • elec.jpg β€” A background image for the control page

login.htm

Start with the basic HTML structure:

<!DOCTYPE HTML>
<html>
  <head>
  </head>
  <body>
  </body>
</html>

Add title and stylesheet link inside the head:

<title>Login</title>
<link rel="stylesheet" href="style.css"/>

Add the JavaScript between <script> tags. The login() function takes data written in the #user and #pass fields and sends it to the server as an HTTP request. For instance if we write β€œuser” / β€œ1234” the request will be a string: user=user&pass=1234. The timeFunction() requests and returns the local time of the system.

<Script>
  function login()
  {
    const user = document.querySelector('#user')
    const pass = document.querySelector('#pass')
    const self = event.target
    self.disabled = true;
    fetch(`user=${user.value}&pass=${pass.value}`).then(r => {
      if (r.status == 200) {
        window.location = 'main.htm'
      } else {
        pass.value = ''
      }
      self.disabled = false;
    }).catch(e => {
      self.disabled = false;
    })
  }

  function timeFunction()
  {
    var now = new Date();
    return now.toLocaleString();
  }
  setInterval("timeFunction()", 1000);
  var displayTime = timeFunction();
</Script>

Display the time in the body:

<h3>Time: <script>document.write(timeFunction());</script></h3>

Complete body with the login form:

<body>
  <h3>Time: <script>document.write(timeFunction());</script></h3>

  <div class="login">
    <form class="loginForm">
      Username: <input type="text" id="user"/><br/>
      Password: <input type="password" id="pass"/><br/>
      <button onclick="login()">Login</button>
    </form>
  </div>
</body>

Missing

Login page screenshot (1024Γ—773)

CSS for the login container in style.css:

.login
{
  position: absolute;
  top: calc(50% - 35px);
  left: calc(50% - 125px);
  border: 1px solid white;
  width: 250px;
  height: 80px;
  padding: 10px;
}

main.htm

If authentication succeeds the server loads the menu page. There will be just two options: continue to the control page or logout. This page may potentially contain access to many other pages or databases in a larger project.

<!DOCTYPE HTML>
<html>
<head>
  <title>Main page</title>
  <link rel="stylesheet" href="style.css"/>
</head>
<body>
  <div id="welcome">
    <h1>Welcome root!</h1>
    |<a href="control.htm">Go to control page</a>|
    <a href="login.htm">Logout</a>|
  </div>
</body>
</html>

Missing

Main menu page screenshot (406Γ—286)

control.htm

Control.htm will be the page used to control the colors of the LED. We'll build a realistic LED illustration using CSS shapes and box shadows, with checkboxes for each color channel.

CSS for the welcome container and LED shape:

#welcome
{
  position: absolute;
  left: calc(45% - 50px);
}

.LED
{
  position: absolute;
  width: 230px;
  height: 400px;
  top: 250px;
  left: 0px;
}

/* LED head β€” square with rounded top */
.sqr
{
  box-shadow: inset 0 0 20px rgba(0,0,0,1),
              0 0 30px 0 rgba(0,0,0,1);
  position: absolute;
  background-color: darkgrey;
  width: 160px;
  height: 180px;
  border-top-left-radius: 80px;
  border-top-right-radius: 80px;
  top: 10px;
  left: 20px;
}

/* LED base β€” rectangle */
.rctngl
{
  box-shadow: inset 0 0 20px rgba(0,0,0,1),
              0 0 30px 0 rgba(0,0,0,1);
  position: absolute;
  background-color: darkgrey;
  width: 200px;
  height: 20px;
  top: 180px;
  left: 10px;
}

/* LED legs */
.leagR { position:absolute; background-color:#666666; box-shadow:-3px 2px 2px 2px rgba(0,0,0,0.5); width:8px; height:120px; top:200px; left:162px; }
.leagG { position:absolute; background-color:#666666; box-shadow:-3px 2px 2px 2px rgba(0,0,0,0.5); width:8px; height:120px; top:200px; left:118px; }
.leag5 { position:absolute; background-color:#666666; box-shadow:-3px 2px 2px 2px rgba(0,0,0,0.5); width:8px; height:150px; top:200px; left:74px; }
.leagB { position:absolute; background-color:#666666; box-shadow:-3px 2px 2px 2px rgba(0,0,0,0.5); width:8px; height:120px; top:200px; left:30px; }

HTML body with the LED figure and checkboxes:

<body>
<div id="welcome">
  <h1>Control page</h1>
  <div>
  <div class="LED">
    <div class="sqr"></div>
    <div class="rctngl"></div>
    <div class="leagR">B<input type="checkbox" name="Bin" onClick="clickFunc()"></div>
    <div class="leagG">G<input type="checkbox" name="Gin" onClick="clickFunc()"></div>
    <div class="leag5">5V<input type="checkbox" name="Vin" onClick="clickFunc()"></div>
    <div class="leagB">R<input type="checkbox" name="Rin" onClick="clickFunc()"></div>
  </div>
</div>
</body>

Missing

LED control interface screenshot (758Γ—675)

The onClick="clickFunc()" calls inputHandle() which collects checkbox states and outputs the RGB color code. The value is stored in the global variable output and transmitted to the server as e.g. click?=0101x β€” where the binary digits represent the RGB and power pins. Then ledColor() paints the on-screen LED accordingly.

Complete JavaScript:

<script>
  var output = 14; // 1110 (rgbv) β€” initiate when all is off

  function httpGet(theUrl)
  {
    var xmlHttp = new XMLHttpRequest();
    xmlHttp.open("GET", theUrl, false);
    xmlHttp.send(null);
    return xmlHttp.responseText;
  }

  function rgb(r, g, b)
  {
    return "rgb(" + r + "," + g + "," + b + ")";
  }

  function inputHandle()
  {
    var valueR = 0, valueG = 0, valueB = 0;
    output = 14; // 1110
    if (document.getElementsByName("Vin")[0].checked)
    {
      output += 1;
      if (document.getElementsByName("Rin")[0].checked) { output -= 8; valueR = 255; }
      if (document.getElementsByName("Gin")[0].checked) { output -= 4; valueG = 255; }
      if (document.getElementsByName("Bin")[0].checked) { output -= 2; valueB = 255; }
      if (valueR || valueG || valueB) return rgb(valueR, valueG, valueB);
      else return "darkgrey";
    }
    else return "darkgrey";
  }

  function ledColor(color)
  {
    var shade;
    if (color == "darkgrey")
      shade = "inset 0 0 20px rgba(0,0,0,1), 0 0 30px 0 rgba(0,0,0,1)";
    else
    {
      shade = "inset 0 0 20px rgba(0,0,0,1), 0 0 150px 0 ";
      shade = shade.concat(color);
    }
    document.getElementsByClassName("sqr")[0].style.backgroundColor = color;
    document.getElementsByClassName("sqr")[0].style.boxShadow = shade;
    document.getElementsByClassName("rctngl")[0].style.backgroundColor = color;
    document.getElementsByClassName("rctngl")[0].style.boxShadow = shade;
  }

  function clickFunc()
  {
    ledColor(inputHandle());
    httpGet("click?=" + output.toString() + "x");
  }
</script>

Error Handler

Every web server needs to handle errors. Here we expect two types:

  • 401 β€” Authentication fail (wrong password)
  • 404 β€” Page not found (user entered a bad URL)

401.htm:

<!DOCTYPE HTML>
<head><title>401 Error</title></head>
<body>
  <style>body{ background-color: lightblue; }</style>
  <h1>401: Authentication error.<br/>Are you authorized!?</h1>
</body>

404.htm handles invalid URL paths entered by the user.

That concludes the website design. Save all of the files on the SD card and insert it into the Ethernet shield.

Arduino Server

We will program the Arduino to serve as a web server that will host the website saved on the SD card. The Arduino should run the following algorithm:

Missing

Server algorithm flowchart (673Γ—945)

Include the required libraries:

#include <SPI.h>
#include <Ethernet.h>
#include <SD.h>

Set the MAC address, IP and port:

byte mac[] = { 0xDE, 0xAD, 0xBE, 0xEF, 0xFE, 0xED };
#define IP IPAddress(192,168,0,12)
EthernetServer server(80);

In the setup we initialize the SD card with SD.begin() β€” it should return TRUE. To start the server we use Ethernet.begin() with our IP and MAC of choice and then enter the loop. In the loop we await a connection request. If so, we check that the client sends appropriate HTTP packets and load the suited page or action β€” whether it's a login page or an LED output update.

If the client pressed the login button the server expects the HTTP request user=root&pass=1234. Otherwise the server responds with 401. It is important for the server to respond to every request with the appropriate response code β€” 200 for accepted, plus the content type.

Upload the following code to your Arduino:

1."text-[#c62828]">//Arduino WebPage circuit control 2018
2."text-[#c62828]">//Author: Dirty Dail
3.
4.#include <SPI.h>
5.#include <Ethernet.h>
6.#include <SD.h>
7.
8.#define REQ_BUF_SZ 40 "text-[#c62828]">// size of buffer used to capture HTTP requests
9.
10.byte mac[] = { 0xDE, 0xAD, 0xBE, 0xEF, 0xFE, 0xED };
11.#define IP IPAddress(192,168,0,12)
12.
13.EthernetServer server(80); "text-[#c62828]">// create a server at port 80
14.File webFile; "text-[#c62828]">// handle to files on SD card
15.char HTTP_req[REQ_BUF_SZ] = {0}; "text-[#c62828]">// buffered HTTP request stored as null terminated string
16.byte req_index = 0; "text-[#c62828]">// index into HTTP_req buffer
17.bool root = false; "text-[#c62828]">// login indicator
18.
19."text-[#c62828]">//RGB LED Pins
20.#define RED 3
21.#define GREEN 5
22.#define BLUE 6
23.#define PWR 2
24.
25.#define SENSOR A0
26.
27."text-[#c62828]">// sets every element of str to 0 (clears array)
28.void StrClear(char *str, char len)
29.{
30. for (int i = 0; i < len; i++)
31. str[i] = 0;
32.}
33.
34."text-[#c62828]">// searches for the string sfind in the string str
35."text-[#c62828]">// returns index if found, 0 if not found
36.byte StrContains(char *str, char *sfind)
37.{
38. #define LEN strlen(str)
39. byte found = 0;
40. byte index = 0;
41. if (strlen(sfind) > LEN) return 0;
42. while (index < LEN)
43. {
44. if (str[index] == sfind[found])
45. {
46. found++;
47. if (strlen(sfind) == found) return index;
48. }
49. else found = 0;
50. index++;
51. }
52. return 0;
53.}
54.
55.void controlHandler(byte output) "text-[#c62828]">// byte = 00001111 (0000rgbv)
56.{
57. digitalWrite(PWR, output % 2);
58. digitalWrite(BLUE, (output / 2) % 2);
59. digitalWrite(GREEN, (output / 4) % 2);
60. digitalWrite(RED, (output / 8) % 2);
61.}
62.
63.void setup()
64.{
65. pinMode(RED, OUTPUT);
66. pinMode(GREEN, OUTPUT);
67. pinMode(BLUE, OUTPUT);
68. pinMode(PWR, OUTPUT);
69. digitalWrite(PWR, LOW);
70. digitalWrite(RED, HIGH);
71. digitalWrite(GREEN, HIGH);
72. digitalWrite(BLUE, HIGH);
73.
74. Serial.begin(9600);
75. Serial.println("Initializing SD card...");
76. if (!SD.begin(4))
77. {
78. Serial.println("ERROR - SD card initialization failed!");
79. return;
80. }
81. Serial.println("SUCCESS - SD card initialized.");
82. Ethernet.begin(mac, IP);
83. server.begin();
84.}
85.
86.void loop()
87.{
88. EthernetClient client = server.available();
89.
90. if (client)
91. {
92. bool currentLineIsBlank = true;
93. while (client.connected())
94. {
95. if (client.available())
96. {
97. char c = client.read();
98. if (req_index < (REQ_BUF_SZ - 1))
99. {
100. HTTP_req[req_index] = c;
101. req_index++;
102. }
103. Serial.print(c);
104. if (c == '\n' && currentLineIsBlank)
105. {
106. if (root) "text-[#c62828]">// client authorized?
107. {
108. if (StrContains(HTTP_req, "GET / ") || StrContains(HTTP_req, "GET /login.htm"))
109. {
110. root = false;
111. client.println("HTTP/1.1 200 OK");
112. client.println("Content-Type: text/html");
113. client.println("Connnection: close");
114. client.println();
115. webFile = SD.open("login.htm");
116. }
117. else if (StrContains(HTTP_req, "control.htm"))
118. {
119. client.println("HTTP/1.1 200 OK");
120. client.println("Content-Type: text/html");
121. client.println("Connnection: close");
122. client.println();
123. webFile = SD.open("control.htm");
124. }
125. else if (StrContains(HTTP_req, "main.htm"))
126. {
127. client.println("HTTP/1.1 200 OK");
128. client.println("Content-Type: text/html");
129. client.println("Connnection: close");
130. client.println();
131. webFile = SD.open("main.htm");
132. }
133. else if (StrContains(HTTP_req, "elec.jpg"))
134. {
135. client.println("HTTP/1.1 200 OK");
136. client.println();
137. webFile = SD.open("elec.jpg");
138. }
139. else if (StrContains(HTTP_req, "style.css"))
140. {
141. client.println("HTTP/1.1 200 OK");
142. client.println("Content-Type: text/css");
143. client.println("Connnection: close");
144. client.println();
145. webFile = SD.open("style.css");
146. }
147. else if (StrContains(HTTP_req, "click?"))
148. {
149. client.println("HTTP/1.1 200 OK");
150. client.println();
151. byte i = StrContains(HTTP_req, "click?") + 2;
152. byte result = 0;
153. byte dig = 0;
154. for (; HTTP_req[i] != 'x'; i++)
155. {
156. dig++;
157. if (dig >= 2) result *= 10;
158. result += (HTTP_req[i] - '0');
159. }
160. controlHandler(result);
161. }
162. else
163. {
164. client.println("HTTP/4.5 404 Not Found");
165. client.println("Content-Type: text/html");
166. client.println("Connnection: close");
167. client.println();
168. webFile = SD.open("404.htm");
169. }
170. }
171. else
172. {
173. if (StrContains(HTTP_req, "GET / ") || StrContains(HTTP_req, "GET /login.htm"))
174. {
175. client.println("HTTP/1.1 200 OK");
176. client.println("Content-Type: text/html");
177. client.println("Connnection: close");
178. client.println();
179. webFile = SD.open("login.htm");
180. }
181. else if (StrContains(HTTP_req, "user=root&pass=1234"))
182. {
183. root = true;
184. client.println("HTTP/1.1 200 OK");
185. client.println("Content-Type: text/html");
186. client.println("Connnection: close");
187. client.println();
188. webFile = SD.open("main.htm");
189. }
190. else if (StrContains(HTTP_req, "style.css"))
191. {
192. client.println("HTTP/1.1 200 OK");
193. client.println("Content-Type: text/css");
194. client.println("Connnection: close");
195. client.println();
196. webFile = SD.open("style.css");
197. }
198. else
199. {
200. client.println("HTTP/4.2 401 Unauthorized");
201. client.println("Content-Type: text/html");
202. client.println("Connnection: close");
203. client.println();
204. webFile = SD.open("401.htm");
205. }
206. }
207. if (webFile)
208. {
209. while (webFile.available())
210. client.write(webFile.read());
211. webFile.close();
212. }
213. req_index = 0;
214. StrClear(HTTP_req, REQ_BUF_SZ);
215. break;
216. }
217. if (c == '\n')
218. currentLineIsBlank = true;
219. else if (c != '\r')
220. currentLineIsBlank = false;
221. }
222. }
223. delay(1);
224. client.stop();
225. }
226.}

Running the server and logging to the website

The project is ready. To connect to the server, power up the Arduino using a USB or a DC power jack. Once powered on the server is up immediately at IP 192.168.0.12.

To connect to the website establish a local area network. Use a modem or router and configure its IP to 192.168.0.1, Subnet Mask: 255.255.255.0. Use an Ethernet cable to connect the Ethernet shield to the router. Connect a PC to another port of the router or enable WiFi on the router and use any device to connect to it.

Now that we are connected to the same network, open a web browser and in the URL enter http://192.168.0.12. The login page should appear on the screen.

Missing

Photo of running setup β€” Arduino connected to router with LED lit (300Γ—225)

Summary

After this project we now learned how to create a website and a web server on an Arduino. We now know the basics of web development and the IoT. This project and all of its software are but an example of the technological potential of web development. From here onward you have the basics to develop and exploit this example into ever more useful and advanced projects.

Thank you

We thank you for learning and hopefully completing our project. We are looking forward to hearing from you in the comment section. Questions and constructive criticism are welcome.

We would like to know what you think about our Arduino web server LED control project